Most modern computer software employs a graphical user interface or GUI. A GUI displays text as well as small images (called icons) that represent objects such as directories, files of different types,command buttons, and drop-down menus. In addition to entering text at the keyboard, the user of a GUI can select an icon with a pointing device, such as a mouse, and move that icon around on the display. Commands can be activated by pressing the Enter key or Control keys, by pressing a command button, or by selecting a dropdown menu item with the mouse. Put more simply, a GUI displays all information, including text, graphically to its users, and allows them to manipulate this information directly with a pointing device.
The structure of a GUI program differs significantly from that of a terminal-based program. Second, a GUI program is event driven, meaning that it is inactive until the user clicks a button or selects a menu option. In contrast, a terminal-based program maintains constant control over the interactions with the user. Put differently, a terminal-based program prompts the user to enter successive inputs, whereas a GUI program allows the user to enter inputs in any order and waits for the user to press a command button or select a menu option.
Eg;Consider total distance traveled by a ball, given three inputs—the initial height from which it is dropped,its bounciness index, and the number of bounces. The total distance traveled for a single bounce is the sum of the distance down and the distance back up. The user may enter the inputs any number of times before quitting the program. The first version of the bouncy program includes a terminal-based user interface,whereas the second version uses a graphical user interface. Although both programs perform exactly the same function, their behavior, or look and feel, from a user’s perspective are quite different.
The Terminal-Based Version
The terminal-based version of the bouncy program displays a greeting and then a menu of command options. The user is prompted for a command number and then enters a number from the keyboard. The program responds by either terminating execution, prompting for the information for a bouncing ball, or printing a message indicating an unrecognized command. After the program processes a command, it displays the menu again and the same process starts over. A sample session with this program is shown in Figure.
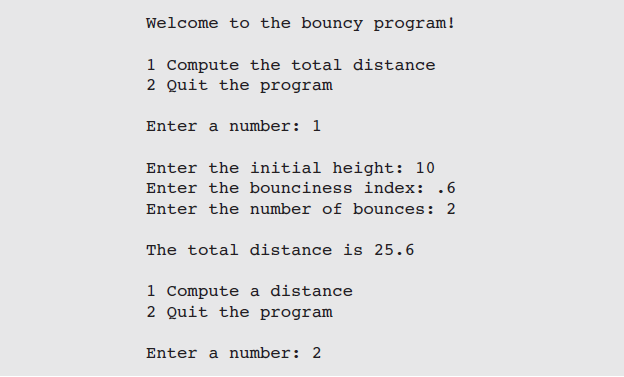
This terminal-based user interface has several obvious effects on its users:
- The user is constrained to reply to a definite sequence of prompts for inputs. Once an input is entered, there is no way to back up and change it.
- To obtain results for a different set of input data, the user must wait for the command menu to be displayed again. At that point, the same command and all of the other inputs must be re-entered.
- The user can enter an unrecognized command.
Each of these effects poses a problem for users that can be solved by converting the interface to a GUI.
The GUI-Based Version
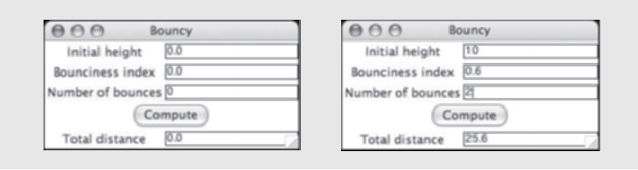
The GUI-based version of the bouncy program displays a window that contains various components, also called window objects or widgets. Some of these components look like text, while others provide visual cues as to their use. Figure below shows snapshots of a sample session with this version of the program. The snapshot on the left shows the interface at program start-up, whereas the snapshot on the right shows the interface after the user has entered inputs and selected the Compute button.
a close study of these features reveals the following effects on users:
- The user is not constrained to enter inputs in a particular order. Before she presses the Compute button, she can edit any of the data in the three input fields.
- Running different data sets does not require re-entering all of the data.The user can edit just one or two values and press the Compute button.
- The user cannot enter an unrecognized command. Each command option is presented as a virtual button to be pressed.
When we compare the effects of the two interfaces on users, the GUI seems to be a definite improvement on the terminal-based user interface. The improvement is even more noticeable as the number of command options increases and the information to be presented grows in quantity and complexity.
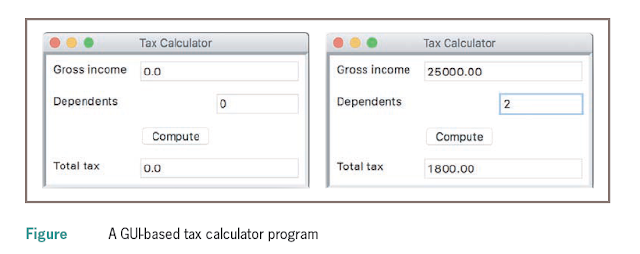
The window in above figure contains the following components:
•A title bar at the top of the window. This bar contains the title of the program, “Tax Calculator.” It also contains three colored disks. Each disk is a command button. The user can use the mouse to click the left disk to quit the program, the middle disk to minimize the window, or the right disk to zoom the window. The user can also move the window around the screen by holding the left mouse button on the title bar and dragging the mouse.
• A set of labels along the left side of the window. These are text elements that describe the inputs and outputs. For example, “Gross income” is one label.
• set of entry fields along the right side of the window. These are boxes within which the program can output text or receive it as input from the user. The first two entry fields will be used for inputs, while the last field will be used for the output. At program start-up, the fields contain default values, as shown in the window on the left side of Figure.
• A single command button labeled Compute. When the user uses the mouse to press this button, the program responds by using the data in the two input fields to compute the income tax. This result is then displayed in the output field. Sample input data and the corresponding output are shown in the window on the right side of Figure .
•The user can also alter the size of the window by holding the mouse on its lower-right corner and dragging in any direction. Although this review of features might seem tedious to anyone who regularly uses GUIbased programs, a careful inventory is necessary for the programmer who builds them. Also, a close study of these features reveals the following effects on users:
•The user is not constrained to enter inputs in a particular order. Before she presses the Compute button, she can edit any of the data in the two input fields.
• Running different data sets does not require re-entering all of the data. The user can edit just one value and press the Compute button to observe different results.
Event-Driven Programming
Rather than guide the user through a series of prompts, a GUI-based program opens a window and waits for the user to manipulate window objects with the mouse. These user-generated events, such as mouse clicks, trigger operations in the program to respond by pulling in inputs, processing them, and displaying results. This type of software system is event-driven, and the type of programming used to create it is called event-driven programming.
Like any complex program, an event-driven program is developed in several steps. In the analysis step, the types of window objects and their arrangement in the window are determined. Because GUI-based programs are almost always object-oriented, this becomes a matter of choosing among GUI component
classes available in the programming language or inventing new ones if needed. Graphic designers and cognitive psychologists might be called in to assist in this phase, if the analysts do not already possess this type of expertise.
GUI-based programs also adhere to the model/view pattern . This pattern separates the resources and responsibilities for managing the data model from those concerned with displaying it and interacting with the users. To a certain extent, the number, types, and arrangement of the window objects depend on the nature of the information to be displayed and also depend on the set of commands that will be available to the user for manipulating that information. Thus, the developers of the GUI also have to converse with the developers of the program’s data model.
In the design of a GUI-based program, a third set of resources called the controller often handles the interactions between a program’s data model and its view. The relationships between these three sets of resources, also called the model/view/controller pattern or MVC, are depicted in Figure
Once the interactions among these resources have been determined, their coding can begin. This phase consists of several steps:
1 Define a new class to represent the main application window.
2 Instantiate the classes of window objects needed for this application, such as labels, fields, and command buttons.
3 Position these components in the window.
4 Instantiate the data model and provide for the display of any default data in the window objects.
5 Register controller methods with each window object in which an event relevant to the application might occur.
6 Define these controller methods.
7 Define a main function that instantiates the window class and runs the appropriate method to launch the GUI.
In coding the program, you could initially skip steps 4–6, which concern the controller and the data model, to develop and refine the view. This would allow you to preview the window and its layout, even though the command buttons and other GUI elements lack functionality.
Coding Simple GUI-Based Programs
In this section, we show some examples of simple GUI-based programs in Python. There are many libraries and toolkits of GUI components available to the Python programmer, but in this we use just two: tkinter and tkMessageBox. Both are standard modules that come with any Python installation.tkinter includes classes for windows and numerous types of window objects.tkMessageBox includes functions for several standard pop-up dialog boxes.
Windows and Labels
Our first demo program defines a class for a main window that displays a greeting.In all of our GUI-based programs, this class extends tkinter’s Frame class. The Frame class provides the basic functionality for any window, such as the command buttons in the title bar.
from tkinter import *
class LabelDemo(Frame):
'''Sets up the window and widgets'''
def __init__(self):
Frame.__init__(self)
self.master.title('Label Demo')
self.grid()
self._label=Label(self,text='Hello world!')
self._label.grid()
def main():
'''Instantiate and pop up the window.'''
LabelDemo().mainloop()
main()

The LabelDemo class’s __init__ method includes five statements that perform the following tasks:
1 Run Frame’s __init__ method to automatically initialize any variables defined in the Frame class.
2 Reset the window’s title. In this line of code, self.master is an instance variable defined in the Frame class. This variable refers to the root window. This window in turn has an instance variable named title, which by default is an empty string.
3 Use the grid method to set the window’s layout manager to a grid layout. A grid layout allows the programmer to place components in the cells of an invisible grid in the window. The nature and purpose of this grid will become clear in upcoming examples that contain multiple window objects.
4 Create the only window component, a Label object. When a component is created, its constructor expects the parent component as an argument.In this case, the parent of the label is the LabelDemo instance, or self. The other arguments can be keyword arguments that specify the component’s attributes. In this example, the label receives a text attribute, whose value is a string of text to be displayed when the label is painted in the window.
5 Use the grid method again to position the label in the window’s grid. In this case, the label will appear centered in the window. The GUI is launched in the main method. This method instantiates LabelDemo and calls its mainloop method. This method pops up the window and waits for user events. At this point, the main method in our own code quits, because the GUI is running a hidden, event-driven loop in a separate process.
This part of the program does not vary much from application to application, so we omit it from the next few examples. If you are running the program as a script from a terminal prompt, pressing the window’s close button will quit the program normally. If you are launching the program from an IDLE window, you should close the shell window as well as the program’s window to terminate the process that is running the GUI.
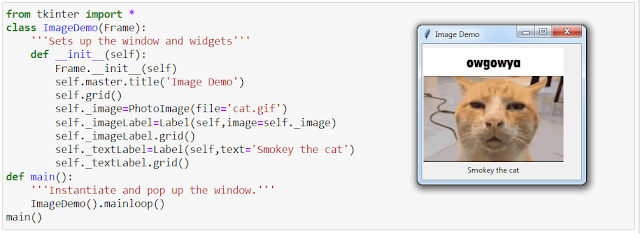
Displaying Images
Our next example modifies the first one slightly, so that the program displays an image and a caption. We use labels for both components. To create a label with an image, two steps are required. First, the __init__ method creates an instance of the class PhotoImage from a GIF file on disk (remember that the image file must be in the current working directory). Then the new label’s image attribute is set to the PhotoImage object. The label for the caption is set up with a text attribute,as described earlier. The image label is placed in the grid before the text label.
The resulting labels are centered in a column in the window. Here is the code and output for the same
Command Buttons and Responding to Events
Command buttons are created and placed in a window in the same manner as labels. Also like labels, a button can display either text or an image. When the Button object receives a text attribute, it displays the associated string. When the button receives an image attribute, it provides a clickable image.
To activate a button and enable it to respond to mouse clicks, you must set its command attribute to an event-handling method. This is done in the main window’s __init__ method when the button is created. The value of the command attribute is just the variable that refers to the event-handling method. The method itself is then defined later in the main window class.
Here is the code for an example program that allows the user to press a button to change a label’s text. The text alternates between “Hello” and “Goodbye”.
Entry Fields for the Input and Output of Text: Area of the Circle
Anyone who shops on the Web has used a form filler to enter a name, password, and credit card number. A form filler consists of labeled entry fields, which allow the user to enter and edit a single line of text. A field can also contain text output by a program. Tkinter’s Entry class is used to display an entry field. To facilitate the input and output of floating-point numbers, an Entry object is associated with a container object of the DoubleVar class. This object contains the data value that is displayed in the Entry object. The DoubleVar object’s set method is used to output a floating-point number to the associated Entry object. Its get method is used to input a floating-point number from the associated Entry object.An Entry object is set up in two steps. First, its DoubleVar object is created.Its default content is 0.0, but its set method may be run to give it a different initial value. Then the Entry is created with the DoubleVar object as the value of its textvariable attribute. The contents of the DoubleVar object can then be accessed or modified by any event-handler methods. The three types of data container objects that can be used with Entry fields (float DoubleVar,int IntVar,str (string) StringVar.) The methods get and set are used with all three types of containers.
The following GUI program computes area of a circle
Using Pop-up Dialog Boxes
GUI-based programs rely extensively on pop-up dialog boxes that display messages, query the user for a Yes/No answer, and so forth. The tkMessageBox module includes several functions that perform these tasks. Some of these functions are listed in Table
The keyword arguments for each function can receive values for the dialog box’s title, message, and parent component, usually the main window from which the pop-up is launched.
Let’s add error handling to the _area method in the GUI program for computing the area of a circle. To do this, we can set up the method to use a try except statement that catches a ValueError. This type of exception is raised when Python attempts to convert a string with a bad format to a number. If a ValueError is raised, the _area method pops up an error dialog box to display a message. Here is the code, followed by a screenshot that shows the pop-up in Figure
Python GUI – tkinter
Tkinter is the inbuilt python module that is used to create GUI applications. It is one of the most commonly used modules for creating GUI applications in Python as it is simple and easy to work with. You don’t need to worry about the installation of the Tkinter module separately as it comes with Python already. It gives an object-oriented interface to the Tk GUI toolkit.
Some other Python Libraries available for creating our own GUI applications are
Kivy
Python Qt
wxPython
Among all Tkinter is most widely used
It is a standard Python interface to the Tk GUI toolkit shipped with Python. Python with tkinter is the fastest and easiest way to create the GUI applications. Creating a GUI using tkinter is an easy task.
To create a tkinter app:
- Importing the module – tkinter
- Create the main window (container)
- Add any number of widgets to the main window
- Apply the event Trigger on the widgets.
Importing tkinter is same as importing any other module in the Python code. Note that the name of the module in Python 2.x is ‘Tkinter’ and in Python 3.x it is ‘tkinter’.
import tkinter
There are two main methods used which the user needs to remember while creating the Python application with GUI.
1.Tk(screenName=None, baseName=None, className=’Tk’, useTk=1): To create a main window, tkinter offers a method ‘Tk(screenName=None, baseName=None, className=’Tk’, useTk=1)’. To change the name of the window, you can change the className to the desired one. The basic code used to create the main window of the application is:
m=tkinter.Tk() where m is the name of the main window object
mainloop(): There is a method known by the name mainloop() is used when your application is ready to run. mainloop() is an infinite loop used to run the application, wait for an event to occur and process the event as long as the window is not closed.
m.mainloop()
import tkinter
m = tkinter.Tk()
'''
widgets are added here
'''
m.mainloop()
Tkinter WidgetsTkinter provides various controls, such as buttons, labels and text boxes used in a GUI application. These controls are commonly called widgets.
There are currently 15 types of widgets in Tkinter. We present these widgets as well as a brief description in the following table −
| Sr.No. | Operator & Description |
|---|
| 1 | Button The Button widget is used to display buttons in your application. |
| 2 | Canvas The Canvas widget is used to draw shapes, such as lines, ovals, polygons and rectangles, in your application. |
| 3 | Checkbutton The Checkbutton widget is used to display a number of options as checkboxes. The user can select multiple options at a time. |
| 4 | Entry The Entry widget is used to display a single-line text field for accepting values from a user. |
| 5 | Frame The Frame widget is used as a container widget to organize other widgets. |
| 6 | Label The Label widget is used to provide a single-line caption for other widgets. It can also contain images. |
| 7 | Listbox The Listbox widget is used to provide a list of options to a user. |
| 8 | Menubutton The Menubutton widget is used to display menus in your application. |
| 9 | Menu The Menu widget is used to provide various commands to a user. These commands are contained inside Menubutton. |
| 10 | Message The Message widget is used to display multiline text fields for accepting values from a user. |
| 11 | Radiobutton The Radiobutton widget is used to display a number of options as radio buttons. The user can select only one option at a time. |
| 12 | Scale The Scale widget is used to provide a slider widget. |
| 13 | Scrollbar The Scrollbar widget is used to add scrolling capability to various widgets, such as list boxes. |
| 14 | Text The Text widget is used to display text in multiple lines. |
| 15 | Toplevel The Toplevel widget is used to provide a separate window container. |
| 16 | Spinbox The Spinbox widget is a variant of the standard Tkinter Entry widget, which can be used to select from a fixed number of values. |
| 17 | PanedWindow A PanedWindow is a container widget that may contain any number of panes, arranged horizontally or vertically. |
| 18 | LabelFrame A labelframe is a simple container widget. Its primary purpose is to act as a spacer or container for complex window layouts. |
| 19 | tkMessageBox This module is used to display message boxes in your applications. |
Fundamental Structure of a tkinter program
Hello world Basic tkinter program
from tkinter import *
# writing code needs to
# create the main window of
# the application creating
# main window object named root
root = Tk()
# giving title to the main window 400x400
root.geometry('400x400')
root.title("First_Program")
# Label is what output will be
# show on the window
label = Label(root, text ="Hello World !")
label.pack()
#button shows a command
button = Button(root, text ='Close',command=root.destroy)
button.pack(side='bottom')
# calling mainloop method which is used
# when your application is ready to run
# and it tells the code to keep displaying
root.mainloop()
Label, textbox(Entry) and Messagebox
from tkinter import *
from tkinter import messagebox
top = Tk()
top.title("Welcome to innovate app")
top.geometry("350x200")
labl = Label(top, text="Hello World!")
labl.grid(column=0, row=0)
txt = Entry(top, width=10)
txt.grid(column=1, row=0)
def click():
messagebox.showinfo("Innovate App","Buttton Clicked")
top.destroy()
btn = Button(top, text ="Click Me", command=click)
btn.grid(column=2, row=0)
top.mainloop()
Creating a login interface
# Program to make a simple
# login screen
import tkinter as tk
root=tk.Tk()
# setting the windows size
root.geometry("600x400")
# declaring string variable
# for storing name and password
name_var=tk.StringVar()
passw_var=tk.StringVar()
# defining a function that will
# get the name and password and
# print them on the screen
def submit():
name=name_var.get()
password=passw_var.get()
print("The name is : " + name)
print("The password is : " + password)
name_var.set("")
passw_var.set("")
# creating a label for
# name using widget Label
name_label = tk.Label(root, text = 'Username')
# creating a entry for input
# name using widget Entry
name_entry = tk.Entry(root,textvariable = name_var)
# creating a label for password
passw_label = tk.Label(root, text = 'Password')
# creating a entry for password
passw_entry=tk.Entry(root, textvariable = passw_var,show = '*')
# creating a button using the widget
# Button that will call the submit function
sub_btn=tk.Button(root,text = 'Submit', command = submit)
# placing the label and entry in
# the required position using grid
# method
name_label.grid(row=0,column=0)
name_entry.grid(row=0,column=1)
passw_label.grid(row=1,column=0)
passw_entry.grid(row=1,column=1)
sub_btn.grid(row=2,column=1)
# performing an infinite loop
# for the window to display
root.mainloop()
Drawing some simple shapes in canvas
from tkinter import *
root = Tk()
C = Canvas(root, bg="yellow",height=250, width=300)
line = C.create_line(108,120,320, 40,fill="green")
arc = C.create_arc(180, 150, 80,210, start=0,extent=220,fill="red")
oval = C.create_oval(80, 30, 140,150,fill="blue")
C.pack()
mainloop()
Creating a simple Menu
# importing only those functions
# which are needed
from tkinter import *
# creating tkinter window
root = Tk()
root.title('Menu Demonstration')
# Creating Menubar
menubar = Menu(root)
# Adding File Menu and commands
file = Menu(menubar, tearoff = 0)
menubar.add_cascade(label ='File', menu = file)
file.add_command(label ='New File', command = None)
file.add_command(label ='Open...', command = None)
file.add_command(label ='Save', command = None)
file.add_separator()
file.add_command(label ='Exit', command = root.destroy)
# Adding Help Menu
help_ = Menu(menubar, tearoff = 0)
menubar.add_cascade(label ='Help', menu = help_)
help_.add_command(label ='Tk Help', command = None)
help_.add_command(label ='Demo', command = None)
help_.add_separator()
help_.add_command(label ='About Tk', command = None)
# display Menu
root.config(menu = menubar)
mainloop()
Write a Python GUI Program to Find the area of the circle
import tkinter as tk
def area():
r= float(entry.get())
a = 3.14*r*r
result.config(text=f"Area={a}")
# Create the main window
root = tk.Tk()
root.title("Area of Circle")
# Create input fields
label = tk.Label(root, text="Enter radius:")
label.pack()
entry = tk.Entry(root)
entry.pack()
# Create a button to trigger the computation
add_button = tk.Button(root, text="Find Area", command=area)
add_button.pack()
# Label to display the result
result = tk.Label(root, text="Area: ")
result.pack()
# Start the main event loop
root.mainloop()
Write Python GUI program to take the birth date and output the age when a button is pressed.
( university question)
from tkinter import *
from datetime import date
def FindAge():
d=e1.get()
d=d.split('/')
birthdate=date(int(d[2]),int(d[1]),int(d[0]))
today = date.today()
age = today.year - birthdate.year - ((today.month, today.day) < (birthdate.month, birthdate.day))
myText.set(age)
master=Tk()
myText=StringVar()
Label(master, text="Date").grid(row=0, sticky=W)
Label(master, text="Age").grid(row=1, sticky=W)
result=Label(master, text="", textvariable=myText).grid(row=1,column=1, sticky=W)
e1 = Entry(master)
e1.grid(row=0, column=1)
b = Button(master, text="Calculate", command=FindAge)
b.grid(row=0, column=2,columnspan=2, rowspan=2,sticky=W+E+N+S, padx=5, pady=5)
mainloop()
How to place an image into a frame in Tkinter?Steps −
Import the required libraries and create an instance of tkinter frame. To open an image and place it inside the frame, we will use the Pillow (PIL) library.
Set the size of the frame using geometry method.
Create a frame and specify its height and width. Place the frame at the center of the window using place() method with anchor='center'.
Open an image using
ImageTk.PhotoImage(Image.open("image"))Next, create a label object inside the frame and pass the image inside the label.
Finally, run the mainloop of the application window
Example Program
# Import required libraries
from tkinter import *
from PIL import ImageTk, Image
# Create an instance of tkinter window
win = Toplevel()
# Define the geometry of the window
win.geometry("700x500")
frame = Frame(win, width=600, height=400)
frame.pack()
frame.place(anchor='center', relx=0.5, rely=0.5)
# Create an object of tkinter ImageTk
img = ImageTk.PhotoImage(Image.open("forest.jpg"))
# Create a Label Widget to display the text or Image
label = Label(frame, image = img)
label.pack()
win.mainloop()
example program
from tkinter import *
from PIL import ImageTk,Image
root = Tk()
canvas = Canvas(root, width = 300, height = 300)
canvas.pack()
img = ImageTk.PhotoImage(Image.open("forest.jpg"))
canvas.create_image(20,20, anchor=NW, image=img)
mainloop()
Adding two numbers using GUI in tkinter ( university question)
from tkinter import *
def addNumbers():
res=int(e1.get())+int(e2.get())
myText.set(res)
master = Tk()
myText=StringVar()
Label(master, text="First").grid(row=0, sticky=W)
Label(master, text="Second").grid(row=1, sticky=W)
Label(master, text="Result:").grid(row=3, sticky=W)
result=Label(master, text="", textvariable=myText).grid(row=3,column=1, sticky=W)
e1 = Entry(master)
e2 = Entry(master)
e1.grid(row=0, column=1)
e2.grid(row=1, column=1)
b = Button(master, text="Calculate", command=addNumbers)
b.grid(row=0, column=2,columnspan=2, rowspan=2,sticky=W+E+N+S, padx=5, pady=5)
mainloop()
Simple Code
import tkinter as tk
def add_numbers():
num1 = float(entry1.get())
num2 = float(entry2.get())
result = num1 + num2
result_label.config(text=f"Result: {result}")
# Create the main window
root = tk.Tk()
root.title("Add Two Numbers")
# Create input fields
label1 = tk.Label(root, text="Enter first number:")
label1.pack()
entry1 = tk.Entry(root)
entry1.pack()
label2 = tk.Label(root, text="Enter second number:")
label2.pack()
entry2 = tk.Entry(root)
entry2.pack()
# Create a button to trigger the addition
add_button = tk.Button(root, text="Add", command=add_numbers)
add_button.pack()
# Label to display the result
result_label = tk.Label(root, text="Result: ")
result_label.pack()
# Start the main event loop
root.mainloop()
Write a GUI-based program that
allows the user to convert temperature values between degrees Fahrenheit and
degrees Celsius. The interface should have labeled entry fields for these two
values. These components should be arranged in a grid where the labels occupy
the first row and the corresponding fields occupy the second row. At start-up,
the Fahrenheit field should contain 32.0, and the Celsius field should contain
0.0. The third row in the window contains two command buttons, labeled
>>>> and <<<<. When the user presses the first button,
the program should use the data in the Fahrenheit field to compute the Celsius
value, which should then be output to the Celsius field. The second button
should perform the inverse function.
from tkinter import *
def FartoCel():
f=float(e1.get())
c=(f-32)*5/9
e2.delete(0,END)
e2.insert(END,str(c))
def CeltoFar():
c=int(e2.get())
f=c*9/5.0+32
e1.delete(0,END)
e1.insert(END,str(f))
master = Tk()
Label(master, text="Fahrenheit").grid(row=0,column=0)
Label(master, text="Celsius").grid(row=0,column=1)
e1 = Entry(master)
e2 = Entry(master)
e1.grid(row=1, column=0)
e2.grid(row=1, column=1)
e1.insert(END,"32.0")
e2.insert(END,"0.0")
b1 = Button(master, text=">>>", command=FartoCel)
b1.grid(row=3, column=0,padx=5, pady=5)
b2 = Button(master, text="<<<", command=CeltoFar)
b2.grid(row=3, column=1, padx=5, pady=5)
mainloop()
Write a GUI-based program that allows the user to convert amount in Indian Rupees to amount in Euro. The interface should have labeled entry fields for these two values. These components should be arranged in a grid where the labels occupy the first row and the corresponding fields occupy the second row. At start-up, the Rupees field should contain 0.0, and the Euro field should contain 0.0. The third row in the window contains two command buttons, labeled R->E and E->R. When the user presses the first button, the program should use the data in the Rupee field to compute the amount in Euro, which should then be output to the Euro field. The second button should perform the inverse function. ( university question)
from tkinter import *
def RtoE(): # rupees to euro conversion
r=float(e1.get())
e=r*0.01127
e2.delete(0,END)
e2.insert(END,str(e))
def EtoR(): #euro to rupees conversion
e=int(e2.get())
r=88.68*e
e1.delete(0,END)
e1.insert(END,str(r))
master = Tk()
#creating labels
Label(master, text="Rupees").grid(row=0,column=0)
Label(master, text="Euro").grid(row=0,column=1)
#creating entry boxes
e1 = Entry(master)
e2 = Entry(master)
e1.grid(row=1, column=0)
e2.grid(row=1, column=1)
e1.insert(END,"0.0")
e2.insert(END,"0.0")
#creating action buttons
b1 = Button(master, text="R->E", command=RtoE)
b1.grid(row=3, column=0,padx=5, pady=5)
b2 = Button(master, text="E->R", command=EtoR)
b2.grid(row=3, column=1, padx=5, pady=5)
mainloop()
code with error checking
import tkinter as tk
# Conversion rate (1 INR = 0.011 EUR as of October 2023)
INR_TO_EUR_RATE = 0.011
# Function to convert INR to EUR
def convert_rupees_to_euros():
try:
rupees = float(rupees_entry.get()) # Get the value from the Rupees entry field
euros = rupees * INR_TO_EUR_RATE # Perform the conversion
euros_entry.delete(0, tk.END) # Clear the Euro field
euros_entry.insert(0, f"{euros:.2f}") # Display the result in the Euro field
except ValueError:
euros_entry.delete(0, tk.END)
euros_entry.insert(0, "Invalid input")
# Function to convert EUR to INR
def convert_euros_to_rupees():
try:
euros = float(euros_entry.get()) # Get the value from the Euro entry field
rupees = euros / INR_TO_EUR_RATE # Perform the conversion
rupees_entry.delete(0, tk.END) # Clear the Rupees field
rupees_entry.insert(0, f"{rupees:.2f}") # Display the result in the Rupees field
except ValueError:
rupees_entry.delete(0, tk.END)
rupees_entry.insert(0, "Invalid input")
# Create the main window
root = tk.Tk()
root.title("Currency Converter - INR to EUR")
# Create labels and entry fields for Rupees and Euros
rupees_label = tk.Label(root, text="Indian Rupees (INR):")
rupees_label.grid(row=0, column=0, padx=10, pady=10)
rupees_entry = tk.Entry(root)
rupees_entry.grid(row=1, column=0, padx=10, pady=10)
rupees_entry.insert(0, "0.0") # Initialize with 0.0
euros_label = tk.Label(root, text="Euros (EUR):")
euros_label.grid(row=0, column=1, padx=10, pady=10)
euros_entry = tk.Entry(root)
euros_entry.grid(row=1, column=1, padx=10, pady=10)
euros_entry.insert(0, "0.0") # Initialize with 0.0
# Create buttons for conversion
rupees_to_euros_button = tk.Button(root, text="R->E", command=convert_rupees_to_euros)
rupees_to_euros_button.grid(row=2, column=0, padx=10, pady=10)
euros_to_rupees_button = tk.Button(root, text="E->R", command=convert_euros_to_rupees)
euros_to_rupees_button.grid(row=2, column=1, padx=10, pady=10)
# Start the main event loop
root.mainloop()
Write a Python GUI program which draws coordinates of mouse presses on a canvas.( university question)
import tkinter as tk
# Function to handle mouse click events
def draw_coordinates(event):
x = event.x
y = event.y
# Display the coordinates at the click position
canvas.create_text(x, y, text=f"({x}, {y})", anchor="nw", fill="blue")
# Create the main window
root = tk.Tk()
root.title("Mouse Click Coordinates")
# Create a Canvas widget
canvas = tk.Canvas(root, width=400, height=300, bg="white")
canvas.pack()
# Bind left mouse click to the canvas
canvas.bind("<Button-1>", draw_coordinates)
# Run the Tkinter event loop
root.mainloop()


Comments
Post a Comment